The return of Rubik's famous Magic Cube
(design: August 2003)
(Pictures of my creations can also be found in my BrickShelf folder)
1. The idea
When I had my first fast DSL internet-connection installed (end 2001), I could finally start searching the web. But what should I search for? Because I'm an AFOL (adult fan of LEGO), I simply entered the keyword LEGO in my search engine. The first webpage I encountered was of course the official LEGO website. I wouldn't find anything interesting there, in fact I wanted to find other AFOL's showing their creations on a webpage. There were lots of them, some of them even better than others. The best webpages I encountered in this early stage of web-searching were LEGO trucks and heavy equipment built by Dennis Bosman (some of his models would fit in the "Model Team" series), Original Technic Models by Jennifer Clark (the best of the best, considering my own interest in LEGO Technic), and Eric Harshbarger's LEGO pages (some of his models would really fit in one of the LEGOLAND parcs). In a later stage (after I bought my own Robotics Invention System) I also discovered JP Brown's Cubesolver.
When I saw JP Brown's Cubesolver I wondered why he built something this difficult. Why didn't he - or Eric Harshbarger - build Rubik's Cube first? That would have been much easier. At least I thought it would have been much easier before I tried to build it myself. In fact, their webpages inspired me to create something special out of LEGO elements: Rubik's famous magic Cube. I can tell you: it sure was a challenge.
2. Start building
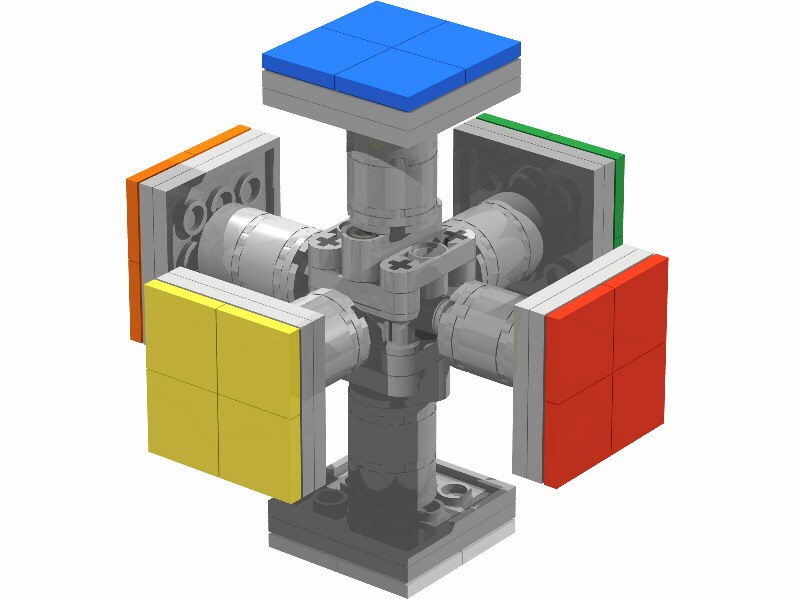
How do you start to build a Rubik Cube? Simple, you just open the real cube to see how it looks on the inside. The most important part is the centre: six axles in six different directions turning independant of each other. I managed to make this centre quite small (click on picture to enlarge) or download the DAT-file (drawn with MLCAD, use "view mode" for building instructions).
Remark: I actually built this centre first, the MLCAD-drawing was made afterwards.
I soon realized that it was not possible to build the middle and corner elements with the currently existing LEGO elements: to achieve smooth turning and prevent from blocking, the elements should move alongside each other following a smooth curve (circle).
|  |
3. The circle
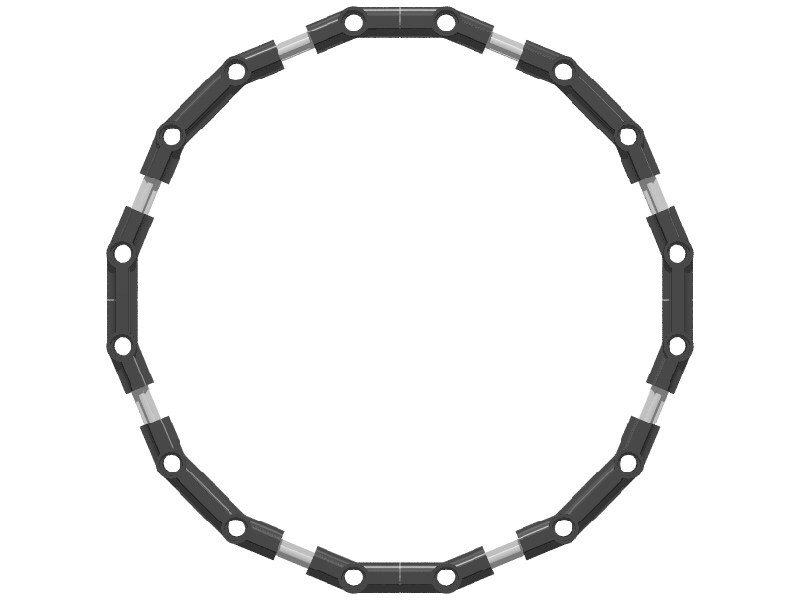 |
Once you've opened the original cube and removed the top layer, you can clearly see the circle divided in eight (not necessarily equal) segments. How can I create a circle (divisible in eight segments!) with standard LEGO elements? It cannot be done with arches: if you're able to create a circle, it'll never be divisible in eight. That's why I tried to approach a circle using technic angle connectors. Think the white axles away and you have eight almost equal pieces left.
Next question is how to implement this circle into the cube. I've put this circle on a chequered page (studs size) to see what the minimum size of the cube would be. It would be big, too big. I came up with a size of 8x8x8 studs for every piece of the cube (instead of 4x4x4 of the first version). |
4. Virtual creation
At this point I knew my cube was going to be very big. The one thing I didn't want to do was to throw all my LEGO pieces together (throwing them together is easy, putting the pieces back in their corresponding boxes will be much harder). So I decided to create a virtual cube first. On the internet you can find anything, including a program to draw LEGO-creations.
I followed the instructions from ldraw.org and lm-software to install MLCad.
LEGO elements are not cubic. The trick to make cubes is always the same:
2 studs = 5 plates
Unfortunately I need studs on at least two sides of these cubes (to attach the coloured tiles to finish the cube), that's why I used this same basic principle throughout the design. |
 |
5. At last, the files
 |
 |
 |
Centre : 1x
|
Top : 6x
|
Middle : 12x
|
|
 |
 |
|
|
Corner-1 : 4x |
Corner-2 : 4x |
|
Remarks:
- Corner-2 is only a mirrored version of Corner-1. This was purely done for aesthetic reasons: the 1x8 tiles (72 in total) of one colour will all point in the same direction.
- Have you noticed the small wheels on the Middle- and Corner- pieces? They are not on the real cube. I carefully calculated the distance from the centre to the technic angle connectors (the circle). There should never be a point of contact between the wheels and the circle, but if there was one, the wheels will prevent from blocking.
6. Complete assembly
7. Does it work?
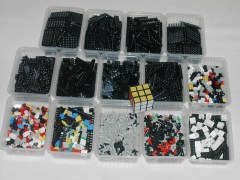
Just to proove that my theory is right, I have to build the Cube. To collect all the necessary pieces, I used the Peeron Set Inventories. These set inventories will also make it possible to put the pieces back in their corresponding boxes afterwards. I didn't have all the required pieces:
- I had to use plates instead of bricks (I tried to build it entirely black)
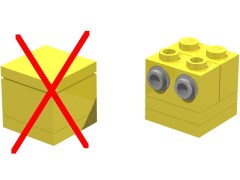
- I don't have any 4x4 round bricks; so I tried to combine 2x2 round bricks with 2x2 round corners. The round corner elements don't hold.
- I don't have enough 1x8 tiles. I only used 2x2 plates as colour indicators instead.
- 1x4 bricks with studs on side were replaced by 1x1 and 1x2 Technic bricks with holes.
|
 |
 |
It works, but... - It weighs approximately 3 kilogram (over 6 pound)!
- It is very difficult to handle (12x12x12 studs instead of 24x24x24 would be much better).
|
 |
 |
- The axes in the centre are not strong enough to hold everything together: gaps appear, big enough for corner- and middle- pieces to drop.
- Partial solution: strapping belts makes the cube much easier to handle.
|
 |
 |
- Slight bumps could occur caused by the Technic angle connectors.
|
 |
There is one thing I forgot to mention: the virtual creation of the Cube was my very first MLCad-drawing. Unlike everybody else I didn't start with a small model to get familiar with the software. I think I did well...
The rendered images are created with MLCad, converted with L3P and rendered with POV-Ray.
Rubik® and Rubik's Cube® are registered trademarks throughout the world of Seven Towns Limited.